Battery switch on travel trailer function is crucial for managing your RV’s power. Understanding how your battery switch works—whether it’s a simple disconnect or a more complex 1-2-both switch—is key to preventing dead batteries and maximizing your travel trailer’s electrical system’s lifespan. This guide breaks down the types of switches, their functions, troubleshooting tips, and safety precautions to keep your RV running smoothly.
We’ll explore the intricacies of power flow, how to add extra batteries safely, and the interaction between your battery switch and other electrical components like your converter, inverter, and solar panels. By the end, you’ll be confident in maintaining and troubleshooting your travel trailer’s battery system.
Battery Switch Types in Travel Trailers
Understanding your travel trailer’s battery switch is crucial for managing power and preventing accidental drain. Different types offer varying levels of control over your battery system. Let’s explore the common options.
Planning a trip? Don’t forget to sort out your travel insurance! Check out Aon travel insurance for comprehensive coverage. Then, if you’re an audiophile, make sure your listening experience is top-notch on the go; research a great audiophile travel setup to enjoy your favorite tunes wherever you roam. Having both sorted will make your trip much smoother and more enjoyable!
Battery Switch Types and Internal Workings
Travel trailers typically use one of two main types of battery switches: the simple disconnect switch and the more versatile 1-2-Both switch.
| Type | Function | Pros | Cons |
|---|---|---|---|
| Disconnect Switch | Provides a simple on/off switch for the battery, completely disconnecting it from the trailer’s electrical system. | Simple, inexpensive, and reliable. Provides complete battery isolation. | Limited functionality; no way to switch between batteries or use both simultaneously. |
| 1-2-Both Switch | Allows selection of battery 1, battery 2, or both batteries simultaneously. Often includes a “off” position as well. | Versatile; allows use of individual batteries or both combined for greater power. Useful for managing charging and discharging of multiple batteries. | Slightly more complex than a disconnect switch; potentially more expensive. |
A simple disconnect switch is essentially a single-pole switch that interrupts the circuit between the battery and the trailer’s electrical system. Imagine a simple on/off light switch; the switch completes or breaks the connection.A 1-2-Both switch, on the other hand, is more intricate. Internally, it uses multiple contacts and possibly relays to route the current to either battery 1, battery 2, both, or none.
Think of it as a three-way switch (and an “off” position), where you can select different combinations of connections to route the power flow. While a diagram would be helpful, it is difficult to describe without visual aid. Essentially, it’s a carefully engineered arrangement of contacts that allows selective connection to the different power sources (batteries).
Identifying Your Battery Switch Type
Locating and identifying your battery switch is a straightforward process. It’s typically found near the battery(ies), often in a readily accessible location for ease of use.
1. Locate the Battery
Begin by finding your travel trailer’s battery or batteries. They are usually housed in a compartment, often near the tongue or rear of the trailer.
2. Look for a Switch
Once you’ve located the battery, carefully examine the wiring connected to it. You’ll likely find a switch near the battery terminals, often mounted on a panel or directly to the battery wiring.
3. Examine the Switch
Observe the switch itself. A disconnect switch will typically have only two positions: ON and OFF. A 1-2-Both switch will have at least three positions: 1, 2, and BOTH (and often an OFF position).
4. Test the Switch (If Safe)
If you’re unsure, carefully and safely test the switch. Turn the switch to different positions and check if the trailer’s 12V system reacts accordingly. This step should only be performed if you are comfortable working with electrical systems and understand the risks.
Function of the Battery Switch: Battery Switch On Travel Trailer Function
The battery switch in your travel trailer is a crucial component for managing power flow and protecting your batteries. It acts as a central control point, allowing you to isolate or connect your house batteries (which power your appliances and lights) from the starting battery (which powers your engine). This simple device plays a surprisingly significant role in maintaining your RV’s electrical system.The primary function of the battery switch is to regulate the flow of electricity between the starting battery and the house batteries.
In the “off” position, it completely disconnects the house batteries from the starting battery and any other power sources, preventing accidental discharge of the house batteries when the trailer is not connected to shore power or the vehicle’s alternator isn’t charging them. This is particularly important during periods of storage when you don’t want your house batteries slowly draining.
When the switch is in the “on” position, it connects the house batteries to the starting battery, allowing them to be charged by the vehicle’s alternator when driving. Some switches also offer a position to connect only the house batteries to shore power, while keeping them isolated from the starting battery.
Preventing Accidental Discharge of House Batteries
The battery switch’s role in preventing accidental discharge is paramount. Imagine leaving your travel trailer parked for several weeks with the interior lights accidentally left on. Without the battery switch, the house batteries would gradually drain, potentially leaving you with a dead battery when you return. By turning the switch to the “off” position, you effectively isolate the house batteries, preventing this type of discharge and ensuring that your batteries are ready when you are.
This simple act significantly extends the lifespan of your batteries and saves you from potential frustration and repair costs.
Conserving Battery Power and Extending Battery Life
Proper use of the battery switch contributes significantly to battery conservation and longevity. By disconnecting the house batteries when not in use, you prevent the slow, parasitic drain that occurs even with appliances turned off. This means your batteries retain their charge for longer periods, requiring less frequent charging and reducing the overall stress on the battery cells. This leads to an extended lifespan, delaying the need for expensive battery replacements.
For example, a properly managed battery system using the switch could easily last 3-5 years, compared to a poorly managed system which may only last 1-2 years due to constant deep discharge cycles.
Troubleshooting Common Battery Switch Issues

Your travel trailer’s battery switch is a crucial component, ensuring you can easily manage power to your appliances and systems. Problems with this switch can leave you stranded without power, so understanding how to troubleshoot and maintain it is vital. This section will guide you through common issues and solutions.
Common Battery Switch Problems
Several issues can cause your battery switch to malfunction. Corrosion is a frequent culprit, building up on the terminals and preventing a good electrical connection. Loose connections, whether at the switch itself or the battery cables, are another common problem. Finally, the switch itself might simply fail due to wear and tear or exposure to the elements. These problems can manifest as a complete lack of power, intermittent power outages, or even a slow drain on your battery.
Troubleshooting a Non-Functional Battery Switch
If your battery switch isn’t working correctly, systematically check the following:
- Inspect for Corrosion: Carefully examine the battery terminals and the switch terminals for corrosion. Look for white, green, or blue powdery deposits. Corrosion can be identified visually as a buildup on the metal surfaces. If present, clean the terminals thoroughly using a wire brush and baking soda paste. Apply a corrosion inhibitor to prevent future buildup.
Remember to disconnect the battery negative terminal before working on the battery or its connections.
- Check for Loose Connections: Ensure all connections are tight. Wiggle the cables connected to both the battery and the switch. Loose connections can cause intermittent power or complete failure. Tighten any loose nuts and bolts. If the cables are damaged or frayed, replace them.
- Test the Switch: Use a multimeter to test the continuity of the switch. Set your multimeter to the continuity setting (usually represented by a diode symbol). Touch the probes to the input and output terminals of the switch in the “on” position. If the multimeter beeps, the switch is likely working. If not, the switch itself is likely faulty and needs replacing.
- Verify Battery Power: Ensure your batteries are charged and functioning correctly. Use a multimeter to check the battery voltage. A low battery voltage will prevent the system from functioning even with a working switch. A fully charged 12-volt battery should show around 12.6 volts.
Preventative Maintenance for Battery Switches
Regular maintenance can significantly extend the lifespan of your battery switch and prevent unexpected failures.
- Regular Cleaning: Clean the battery terminals and switch terminals at least twice a year, or more frequently if your trailer is exposed to harsh conditions. Use a wire brush and baking soda paste to remove corrosion. Apply a corrosion inhibitor after cleaning.
- Tighten Connections: Periodically check and tighten all connections to ensure they remain secure. Loose connections are a major cause of battery switch problems.
- Protect from the Elements: If possible, shield your battery and switch from excessive moisture, dirt, and other environmental factors. A waterproof cover for the battery box can be very beneficial.
- Visual Inspection: Regularly inspect the switch and cables for any signs of damage or wear. Replace any damaged components immediately.
Connecting Additional Batteries
Adding more batteries to your travel trailer’s power system can significantly increase your off-grid runtime, especially if you’re using power-hungry appliances. This section will guide you through the process of safely and effectively connecting additional batteries, focusing on the practical aspects and potential implications. Remember, always consult a qualified electrician if you’re unsure about any aspect of this process.Adding extra batteries boosts your available amp-hours (Ah), meaning you can power your devices for longer.
Planning a trip? Don’t forget to sort out your travel insurance! Check out Aon travel insurance for comprehensive coverage. Then, if you’re an audiophile, you’ll want to look into a great audiophile travel setup to ensure your music sounds amazing on the go. These two things will make your journey way more enjoyable and stress-free!
However, it also increases the charging demands on your charging system, requiring a more powerful charger or a longer charging time. We’ll examine both the wiring and the charging implications of expanding your battery bank.
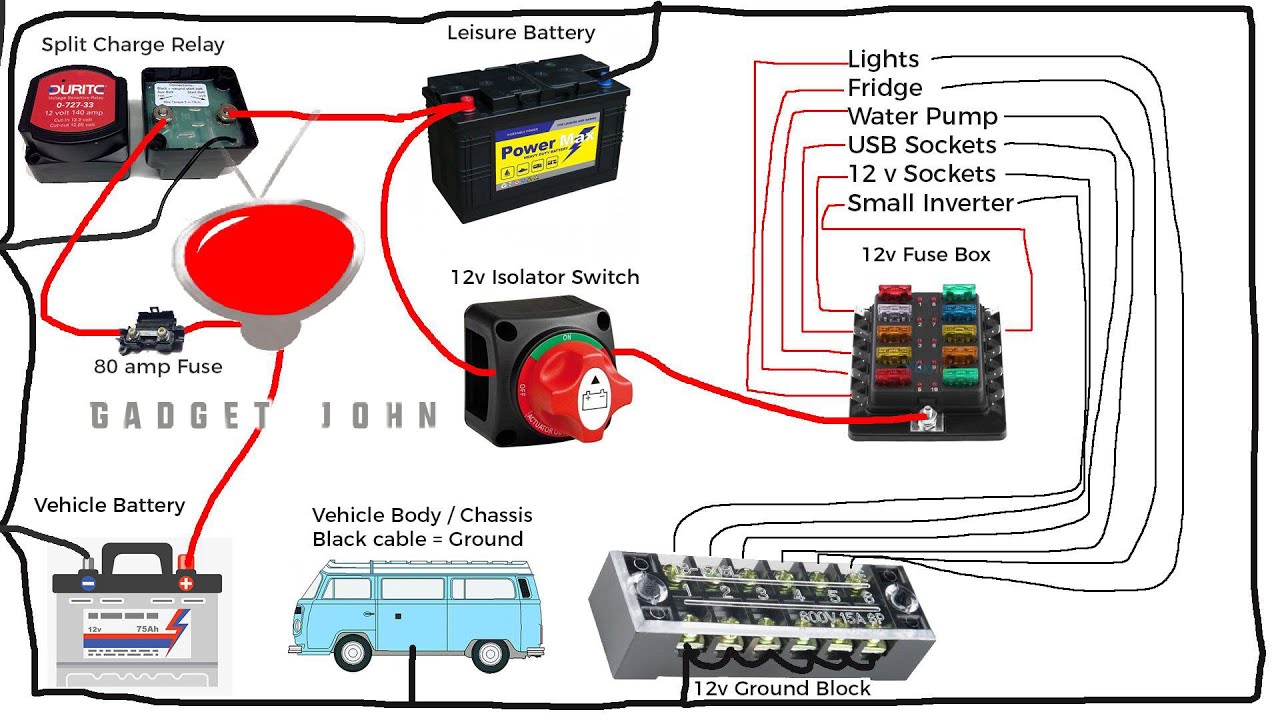
Wiring Diagram for Two 12V Batteries
Imagine a simple diagram. You have two 12V deep-cycle batteries (Battery 1 and Battery 2). Each battery’s positive (+) terminal is connected to a bus bar. A second bus bar connects the negative (-) terminals of both batteries. From the positive bus bar, a heavy-gauge wire runs to the positive (+) terminal of your battery switch.
Similarly, a heavy-gauge wire connects the negative bus bar to the negative (-) terminal of your battery switch. All connections should be secured with appropriately sized ring terminals and corrosion-resistant connectors. This parallel configuration ensures both batteries contribute to the overall system voltage and capacity. The battery switch then controls the power flow to your travel trailer’s electrical system.
All wires should be appropriately sized for the amperage they will carry to avoid overheating and potential fire hazards. Remember to use fuses or circuit breakers in the appropriate locations for safety.
Implications of Adding Additional Batteries
Increasing the number of batteries directly impacts your system’s capacity (measured in amp-hours or Ah). Doubling your batteries roughly doubles your available power. For example, if you initially had two 100Ah batteries, adding two more would give you 400Ah, extending your off-grid time significantly. However, this also increases the charging time. Your existing charging system might struggle to fully charge the larger battery bank, leading to longer charging periods or potentially undercharging.
This could reduce the lifespan of your batteries. You may need to upgrade your charging system to a higher amperage charger or consider adding solar panels to supplement your charging capabilities.
Safety Precautions for Adding Batteries
Proper safety measures are crucial when working with batteries. Always wear safety glasses and gloves. Ensure the area is well-ventilated to avoid exposure to potentially harmful gases released during charging and discharging. Use appropriately sized wire and connectors, and double-check all connections to prevent shorts or sparks. Never mix different types of batteries (e.g., lead-acid and lithium) in the same bank without proper isolation and management systems.
Before connecting any new batteries, ensure they are fully charged to avoid unequal charging effects that could damage the batteries. Consult your travel trailer’s manual and any relevant battery manufacturer instructions for specific safety recommendations. If you’re uncomfortable with any part of the process, seek assistance from a qualified electrician.
Battery Switch and Electrical System Integration
Your travel trailer’s battery switch is the central nervous system of your power distribution. Understanding how it interacts with other electrical components is crucial for efficient power management and preventing problems. This section will explain the relationships between your battery switch and key systems like the converter, inverter, and solar panels.
The battery switch acts as a gatekeeper, controlling the flow of power from your batteries to other parts of your RV’s electrical system. Depending on the switch’s position, it connects or disconnects the batteries from the converter, inverter, and any other devices drawing power from the battery bank. Improper use can lead to drained batteries or even damage to components.
Power Flow Through the Battery Switch
The following flowchart illustrates how power flows through your battery switch under different operating conditions. Imagine the battery switch as a three-way valve controlling the flow of electricity.
(Note: This is a textual representation of a flowchart. A visual flowchart would be beneficial for better understanding.)
Flowchart:
Start -> Battery Switch (Off/Battery 1/Battery 2/Both) -> (Off: No power flow; Battery 1: Power from Battery 1 flows to converter/inverter/loads; Battery 2: Power from Battery 2 flows to converter/inverter/loads; Both: Power from both Battery 1 and Battery 2 flows to converter/inverter/loads) -> Converter (charges batteries from shore power, converts 12V to 120V AC) -> Inverter (converts 12V DC to 120V AC) -> Loads (lights, appliances, etc.) -> End
Power Flow in Different Switch Positions
This table summarizes the power flow for each switch position. Remember, “Loads” represent all the devices in your RV that use electricity.
| Switch Position | Battery 1 | Battery 2 | Power Flow to Loads |
|---|---|---|---|
| Off | Disconnected | Disconnected | No power |
| Battery 1 | Connected | Disconnected | Power from Battery 1 only |
| Battery 2 | Disconnected | Connected | Power from Battery 2 only |
| Both | Connected | Connected | Power from both Battery 1 and Battery 2 |
Safety Considerations with Battery Switches
Working with your travel trailer’s battery system requires caution. Improper handling can lead to serious injury or damage to your RV’s electrical system. Always prioritize safety when dealing with batteries and their associated switching mechanisms.Always disconnect the power to the battery system before performing any maintenance or repairs on the battery switch itself or any related wiring. This prevents accidental shocks or short circuits that could cause sparks, burns, or even fires.
Never assume the power is off; always double-check using a reliable voltage tester.
Potential Hazards of Incorrect Wiring or Usage, Battery switch on travel trailer function
Incorrectly wiring or using a battery switch poses several significant risks. A poorly installed switch could create a fire hazard due to overheating from loose connections or excessive current draw. Improperly wired batteries might lead to a short circuit, potentially damaging the batteries, the switch, and other electrical components in your travel trailer. This could also result in a dangerous electrical shock if touched.
Using the wrong type of switch for your battery system’s voltage and amperage rating can cause overheating and failure, leading to similar hazards. For example, using a switch rated for 50 amps on a system drawing consistently 75 amps will likely cause the switch to overheat and potentially fail, potentially causing a fire.
Importance of Regular Inspection and Maintenance
Regular inspection and maintenance of your battery switch are crucial for safe and reliable operation. Visually inspect the switch and its wiring for any signs of damage, corrosion, or loose connections. Tighten any loose connections and clean any corrosion using a wire brush and battery terminal cleaner. Check the switch’s operation by turning it on and off, ensuring smooth and reliable switching.
If you notice any signs of damage or malfunction, replace the switch immediately. A neglected battery switch can lead to a dangerous situation, including potential fires or equipment damage. Regular preventative maintenance is far less expensive than repairing fire damage or replacing damaged equipment.
Visual Representation of a Battery Switch
Let’s get a clear picture of what a typical travel trailer battery switch looks like and how it’s wired. Understanding its physical characteristics and placement is crucial for safe and effective use.A typical travel trailer battery switch is a relatively small, robust device designed to withstand the rigors of outdoor use. It’s usually made from durable, weather-resistant materials like heavy-duty plastic or metal, often with a protective coating to prevent corrosion.
The switch itself is usually a rotary type, meaning you turn a knob or lever to select different positions. Common sizes range from roughly 3 to 6 inches in diameter, depending on the number of batteries it manages and the amperage it handles. Safety markings are vital; you’ll typically find clearly labeled positions like “OFF,” “BATTERY,” and “BATTERY + SHORES” (or similar variations), often accompanied by symbols or color-coding for clarity.
Important safety warnings about electrical hazards and proper installation might also be printed on the switch’s casing.
Physical Characteristics and Labeling
The switch’s face will clearly indicate its function. You’ll see clearly marked positions, usually with labels like “OFF,” “BATTERY,” and “BATTERY & SHORES” (or variations thereof). These positions control the flow of power from the batteries to the trailer’s electrical system and whether shore power is connected. The labels are typically etched or printed directly onto the switch’s surface, ensuring they are visible and durable.
The size and material of the switch will depend on its amperage rating and the manufacturer, but generally, they are compact and designed for easy installation and access. The overall construction aims for weather resistance and durability to withstand the elements.
Location in a Typical Travel Trailer
The battery switch is usually located in a readily accessible yet protected area, often near the battery itself, inside a compartment that protects the battery and switch from the elements. This placement simplifies the wiring and allows for easy access during maintenance or emergencies. Many manufacturers locate it within a lockable compartment to deter tampering. The specific location can vary depending on the trailer’s design, but it’s generally somewhere close to the batteries for minimal wiring length and easy access for the owner.
This might be under a storage compartment, near a wheel well, or within a dedicated electrical bay.
Typical Connections and Wiring
The battery switch typically has several terminals for connection. There will be at least one input terminal connected to the positive (+) terminal of the battery(ies). Additional terminals are usually provided for connecting the trailer’s electrical system and, in some cases, a shore power connection. These terminals are clearly labeled to avoid confusion, usually with “+” and “-” markings to indicate positive and negative connections.
The wiring itself is typically heavy-gauge wire, sized appropriately to handle the amperage of the battery system. Properly sized wire and secure connections are crucial to prevent overheating and potential fire hazards. A typical setup would involve heavy-gauge cables running from the battery terminals to the switch, and then from the switch to the trailer’s electrical panel.
Incorrect wiring can lead to system malfunctions or even dangerous electrical shocks.
Mastering your travel trailer’s battery switch is essential for a worry-free RV experience. From understanding the different switch types and their functions to performing basic maintenance and troubleshooting, this guide provides the knowledge you need to keep your house batteries charged and ready for adventure. Remember to always prioritize safety when working with electrical systems. Happy travels!
Top FAQs
What happens if my battery switch is corroded?
Corrosion can impede power flow, leading to poor battery performance or a complete failure to charge. Clean the terminals with a wire brush and baking soda solution.
How often should I inspect my battery switch?
Regularly inspect your battery switch, at least once a season, for corrosion, loose connections, and damage.
Can I use a battery switch from a different type of RV?
While similar, battery switches can vary based on amperage and the number of batteries supported. It’s best to use a switch designed for your specific RV’s system.
What size wire should I use when adding additional batteries?
Use appropriately sized wire for the amperage of your system. Consult an electrician or wiring diagram for the correct gauge.
